After long time i am posting this article about Installation of Oracle R12 on a desktop / laptop.
The issue with any ERP is the accessibility for learning new version. If you work in a large enterprise then you have the luxury to access latest Oracle ERP versions but if you are in a small enterprise or independent then accessibility is an issue. Even if you want to learn new features, want to play around and do R&D in latest versions you do not have much choice other than having your own Oracle R12 instance.
Environment-
Host machine -Windows 7 / min 300GB Free disk space / min 4GB RAM / Core2Duo processor
Guest machine -VMWare / VMPlayer 3.x / 300GB Disk space / 4GB RAM / Oracle Enterprise Linux 5.5
Oracle EBS R12 -R12.1.1
I have divided the video in 2 parts.
I hope the videos would help in your installation.
Oracle EBS R12 Installation / Part-1
Oracle EBS R12 Installation / Part-2
Saturday, October 16, 2010
Saturday, May 29, 2010
Setting up Credit Cards in iExpense
Credit Cards functionality in Oracle can be used in the following Oracle modules to automate expenses / procurement busines in the company,
Oracle iExpense
Oracle iProcurement
In this post we will be discussiong about Credit Card functionality used through Oracle iExpense.
Typically large / midium companies give credit cards to their employees to use it for company related expenses.
Company related expenses like Travel expenses (Accomodation, Car rental, Meal etc) / Visa expenses etc.
As part of the process, companies first evaluate which credit card company to go with (like Visa / Master card / AMEX) and then the credit card issuer like Bank of America / CITIBANK / US Bank etc.
There are multiple factors which influences this decision like service offerings / ease of integration / cost factor etc.
In Oracle for iExpense, AMEX being the most popular one.
Once you decide which credit card and credit card issuer to go with, following setup steps are required in Oracle in order to be able to use the credit card functionality in iExpense,
1. Setup Credit card program
2. Setup Credit card profile
3. Setup Credit cards
4. Enable Credit card functionality in iExpense
Sunday, May 16, 2010
Oracle EBS 11i:Creating a simple search/result page in OAF
In this post we will see how to create a simple search/result OAF page. I have taken a simple supplier search/result page as an example.
Pre-requisites for this video:
Check out the following video about how to create a simple search/result page in OAF,
Pre-requisites for this video:
- JDeveloper 9i with OA Extension
- You have the EO / VO / AM (BC4J components) ready for the OAF page -refer my last video on how to create these.
Check out the following video about how to create a simple search/result page in OAF,
Saturday, May 15, 2010
OAF:Creating EO / VO / AM
As part of creating an OAF page using Oracle application framework using JDeveloper 9i, in this post we will see how to create
Pre-requisites for this video tutorial are,
- Entity Object (EO)
- View Object (VO)
- Application Module (AM)
Pre-requisites for this video tutorial are,
- JDeveloper 9i with OA Extension (I have used for Oracle application ver 11.5.10.2CU) - Refer my previous video for the installation of the same.
Wednesday, May 12, 2010
Oracle JDeveloper 9i / 10g with OA Extension installation
Client OS: Windows XP / 2000 / Windows 7
JDeveloper version: JDeveloper 9i / 10g
First get the OA Framework version in your Oracle apps environment using below URL,
http://your_apps_url:port_number/OA_HTML/OAInfo.jsp
replace "your_apps_url" with your APPS URL, PORT_NUMBER with your APPS port number
This will give you info about your OA framework version with some other details about your environment.
Then go to following Oracle metalink note ID:787209.1
This would give you the right patch number to download.
Follow the video to install JDeveloper 9i. This would also work for JDeveloper 10g.
Sunday, April 25, 2010
Oracle EBS 11i setup -Oracle Payables setup
PAYABLE SETUP
Pre-requisites,
--COA is defined
--Set of Books defined
--Legal entity, Operating unit, Inventory Orgs defined
--Payable setup responsibility defined with all the required profiles assigned
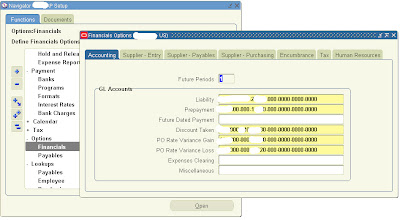
1. Setup Financial Options-
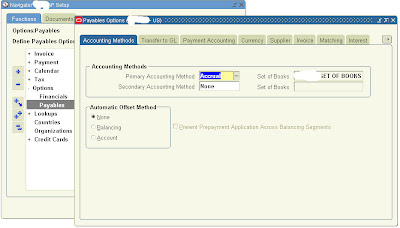
2. Setup Payable options-
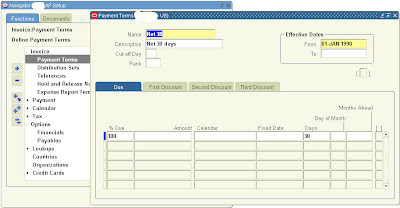
3. Define Payment terms-
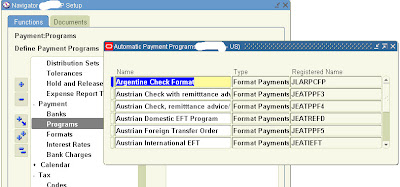
4. Disbursement Bank setup-
a> Setup Payment programs (optional)
b> Setup Payment format (Optional),
If you have custom/specific bank payment format then define payment formats,
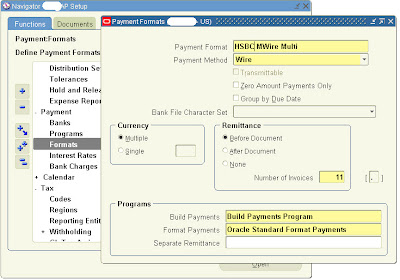
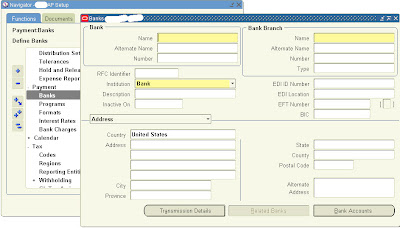
c> Setup Disbursement bank (Required),
You must setup your disbursement bank (internal bank) through which you are going to pay your suppliers,
This concludes your Oracle payable setup. You are ready to create Invoices and pay your suppliers.
Pre-requisites,
--COA is defined
--Set of Books defined
--Legal entity, Operating unit, Inventory Orgs defined
--Payable setup responsibility defined with all the required profiles assigned
1. Setup Financial Options-

2. Setup Payable options-

3. Define Payment terms-

4. Disbursement Bank setup-
a> Setup Payment programs (optional)

b> Setup Payment format (Optional),
If you have custom/specific bank payment format then define payment formats,

c> Setup Disbursement bank (Required),
You must setup your disbursement bank (internal bank) through which you are going to pay your suppliers,

This concludes your Oracle payable setup. You are ready to create Invoices and pay your suppliers.
Oracle EBS 11i setup -Oracle purchasing setup
Purchasing Setup
Assuming your employees are setup in Oracle with valid assignments.
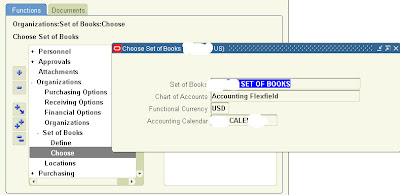
Step 1 - Choose Setup of Books (This is the most important setup and can not be undo once setup. So, pay special attention while doing this setup)
Choose the Correct Setup of Book name. Once setup, this can not be changed. So, be very careful while choosing the set of book name.
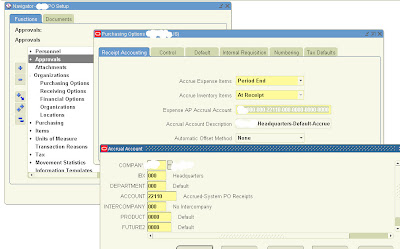
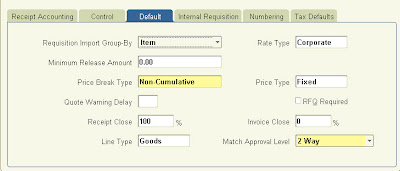
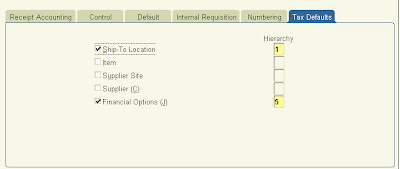
Step 2 - Setup Purchasing Options
Receipt Accounting (Key fields)-
Accrue Expense Items ("Period End")
AP Expense Accrual account -Liability account type
Accrue inventory items (Here it has been set up as "At Receipt")
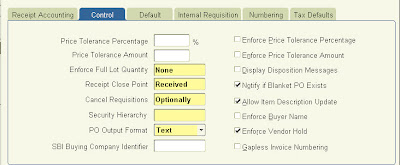
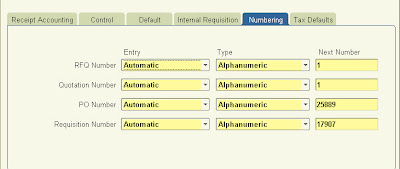
Step 2 - Setup Purchasing Document Types
For more details on each field, you can go to the help screen of this page.
Security level - This option gives you control to set at which level you want this document to be accessible.

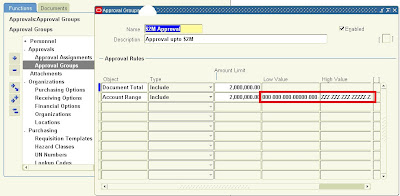
Step 3 - Setup Purchasing Approval Groups
Define the approval groups for your documents.
Document total -Enter the $ limit for this approval group.
Account range -Enter the same $limit and complete account range starting from 000 to ZZZ for all segments.
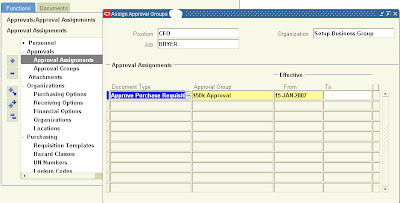
Step 4 - Assign PO Approval Groups to Job or Position depending upon setup in Purchasing options
Assign the approval groups defined in step 3 to Jobs / Positions (depending on the Purchasing options/ Human resources setup).
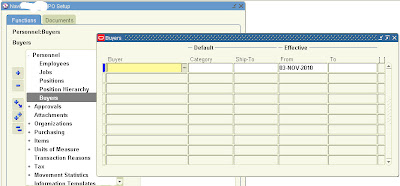
Step 5 - Setup Buyers
Setup new Buyers.
Step 6 - Setup Inventory items or/and Purchasing categories
Setup Purchasing Categories/Inventory items (if you have Inventory setup, optional) to be used while creating POs.

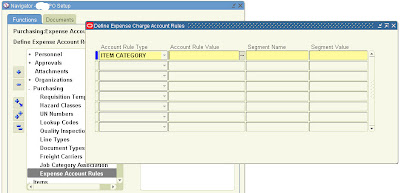
Step 7 - Define Default accounts for Purchasing categories (Optional)
This is an optional setup. If setup then when a purchasing category is chosen while creating the PO, the charge or expense account automatically gets defaulted to the PO at PO distribution level. Work with your business users to get the default accounts for each category to set this up.
Step 8 - Define any custom PO Line types (Optional)

That concludes Purchasing setup. You can now create POs.
Assuming your employees are setup in Oracle with valid assignments.
Step 1 - Choose Setup of Books (This is the most important setup and can not be undo once setup. So, pay special attention while doing this setup)
Choose the Correct Setup of Book name. Once setup, this can not be changed. So, be very careful while choosing the set of book name.

Step 2 - Setup Purchasing Options
Receipt Accounting (Key fields)-
Accrue Expense Items ("Period End")
AP Expense Accrual account -Liability account type
Accrue inventory items (Here it has been set up as "At Receipt")


Step 2 - Setup Purchasing Document Types
For more details on each field, you can go to the help screen of this page.
Security level - This option gives you control to set at which level you want this document to be accessible.

Step 3 - Setup Purchasing Approval Groups
Define the approval groups for your documents.
Document total -Enter the $ limit for this approval group.
Account range -Enter the same $limit and complete account range starting from 000 to ZZZ for all segments.

Step 4 - Assign PO Approval Groups to Job or Position depending upon setup in Purchasing options
Assign the approval groups defined in step 3 to Jobs / Positions (depending on the Purchasing options/ Human resources setup).

Step 5 - Setup Buyers
Setup new Buyers.

Step 6 - Setup Inventory items or/and Purchasing categories
Setup Purchasing Categories/Inventory items (if you have Inventory setup, optional) to be used while creating POs.

Step 7 - Define Default accounts for Purchasing categories (Optional)
This is an optional setup. If setup then when a purchasing category is chosen while creating the PO, the charge or expense account automatically gets defaulted to the PO at PO distribution level. Work with your business users to get the default accounts for each category to set this up.

Step 8 - Define any custom PO Line types (Optional)

That concludes Purchasing setup. You can now create POs.
Subscribe to:
Posts (Atom)